ShopDreamUp AI ArtDreamUp
Deviation Actions


![Noctis' Sword // Final Fantasy XV [3]](https://images-wixmp-ed30a86b8c4ca887773594c2.wixmp.com/f/8d753594-666f-459d-9d65-afcb4f2f69d0/d4kvv8k-6fe822ae-0272-4e07-a066-b5ff5496a533.jpg/v1/crop/w_92,h_92,x_8,y_0,scl_0.037581699346405,q_70,strp/noctis__sword____final_fantasy_xv__3__by_laitz_d4kvv8k-92s.jpg?token=eyJ0eXAiOiJKV1QiLCJhbGciOiJIUzI1NiJ9.eyJzdWIiOiJ1cm46YXBwOjdlMGQxODg5ODIyNjQzNzNhNWYwZDQxNWVhMGQyNmUwIiwiaXNzIjoidXJuOmFwcDo3ZTBkMTg4OTgyMjY0MzczYTVmMGQ0MTVlYTBkMjZlMCIsIm9iaiI6W1t7ImhlaWdodCI6Ijw9NzY4IiwicGF0aCI6IlwvZlwvOGQ3NTM1OTQtNjY2Zi00NTlkLTlkNjUtYWZjYjRmMmY2OWQwXC9kNGt2djhrLTZmZTgyMmFlLTAyNzItNGUwNy1hMDY2LWI1ZmY1NDk2YTUzMy5qcGciLCJ3aWR0aCI6Ijw9MTAyNCJ9XV0sImF1ZCI6WyJ1cm46c2VydmljZTppbWFnZS5vcGVyYXRpb25zIl19.v6diq7MK3hxgqmGn2if91bxmG7rrlA-5YrrSm-TbmVg)


Suggested Deviants


Suggested Collections


You Might Like…


Featured in Groups


Description
The sword is complete! Check it out!


__________________________________
nicknamed "Drive Edge".
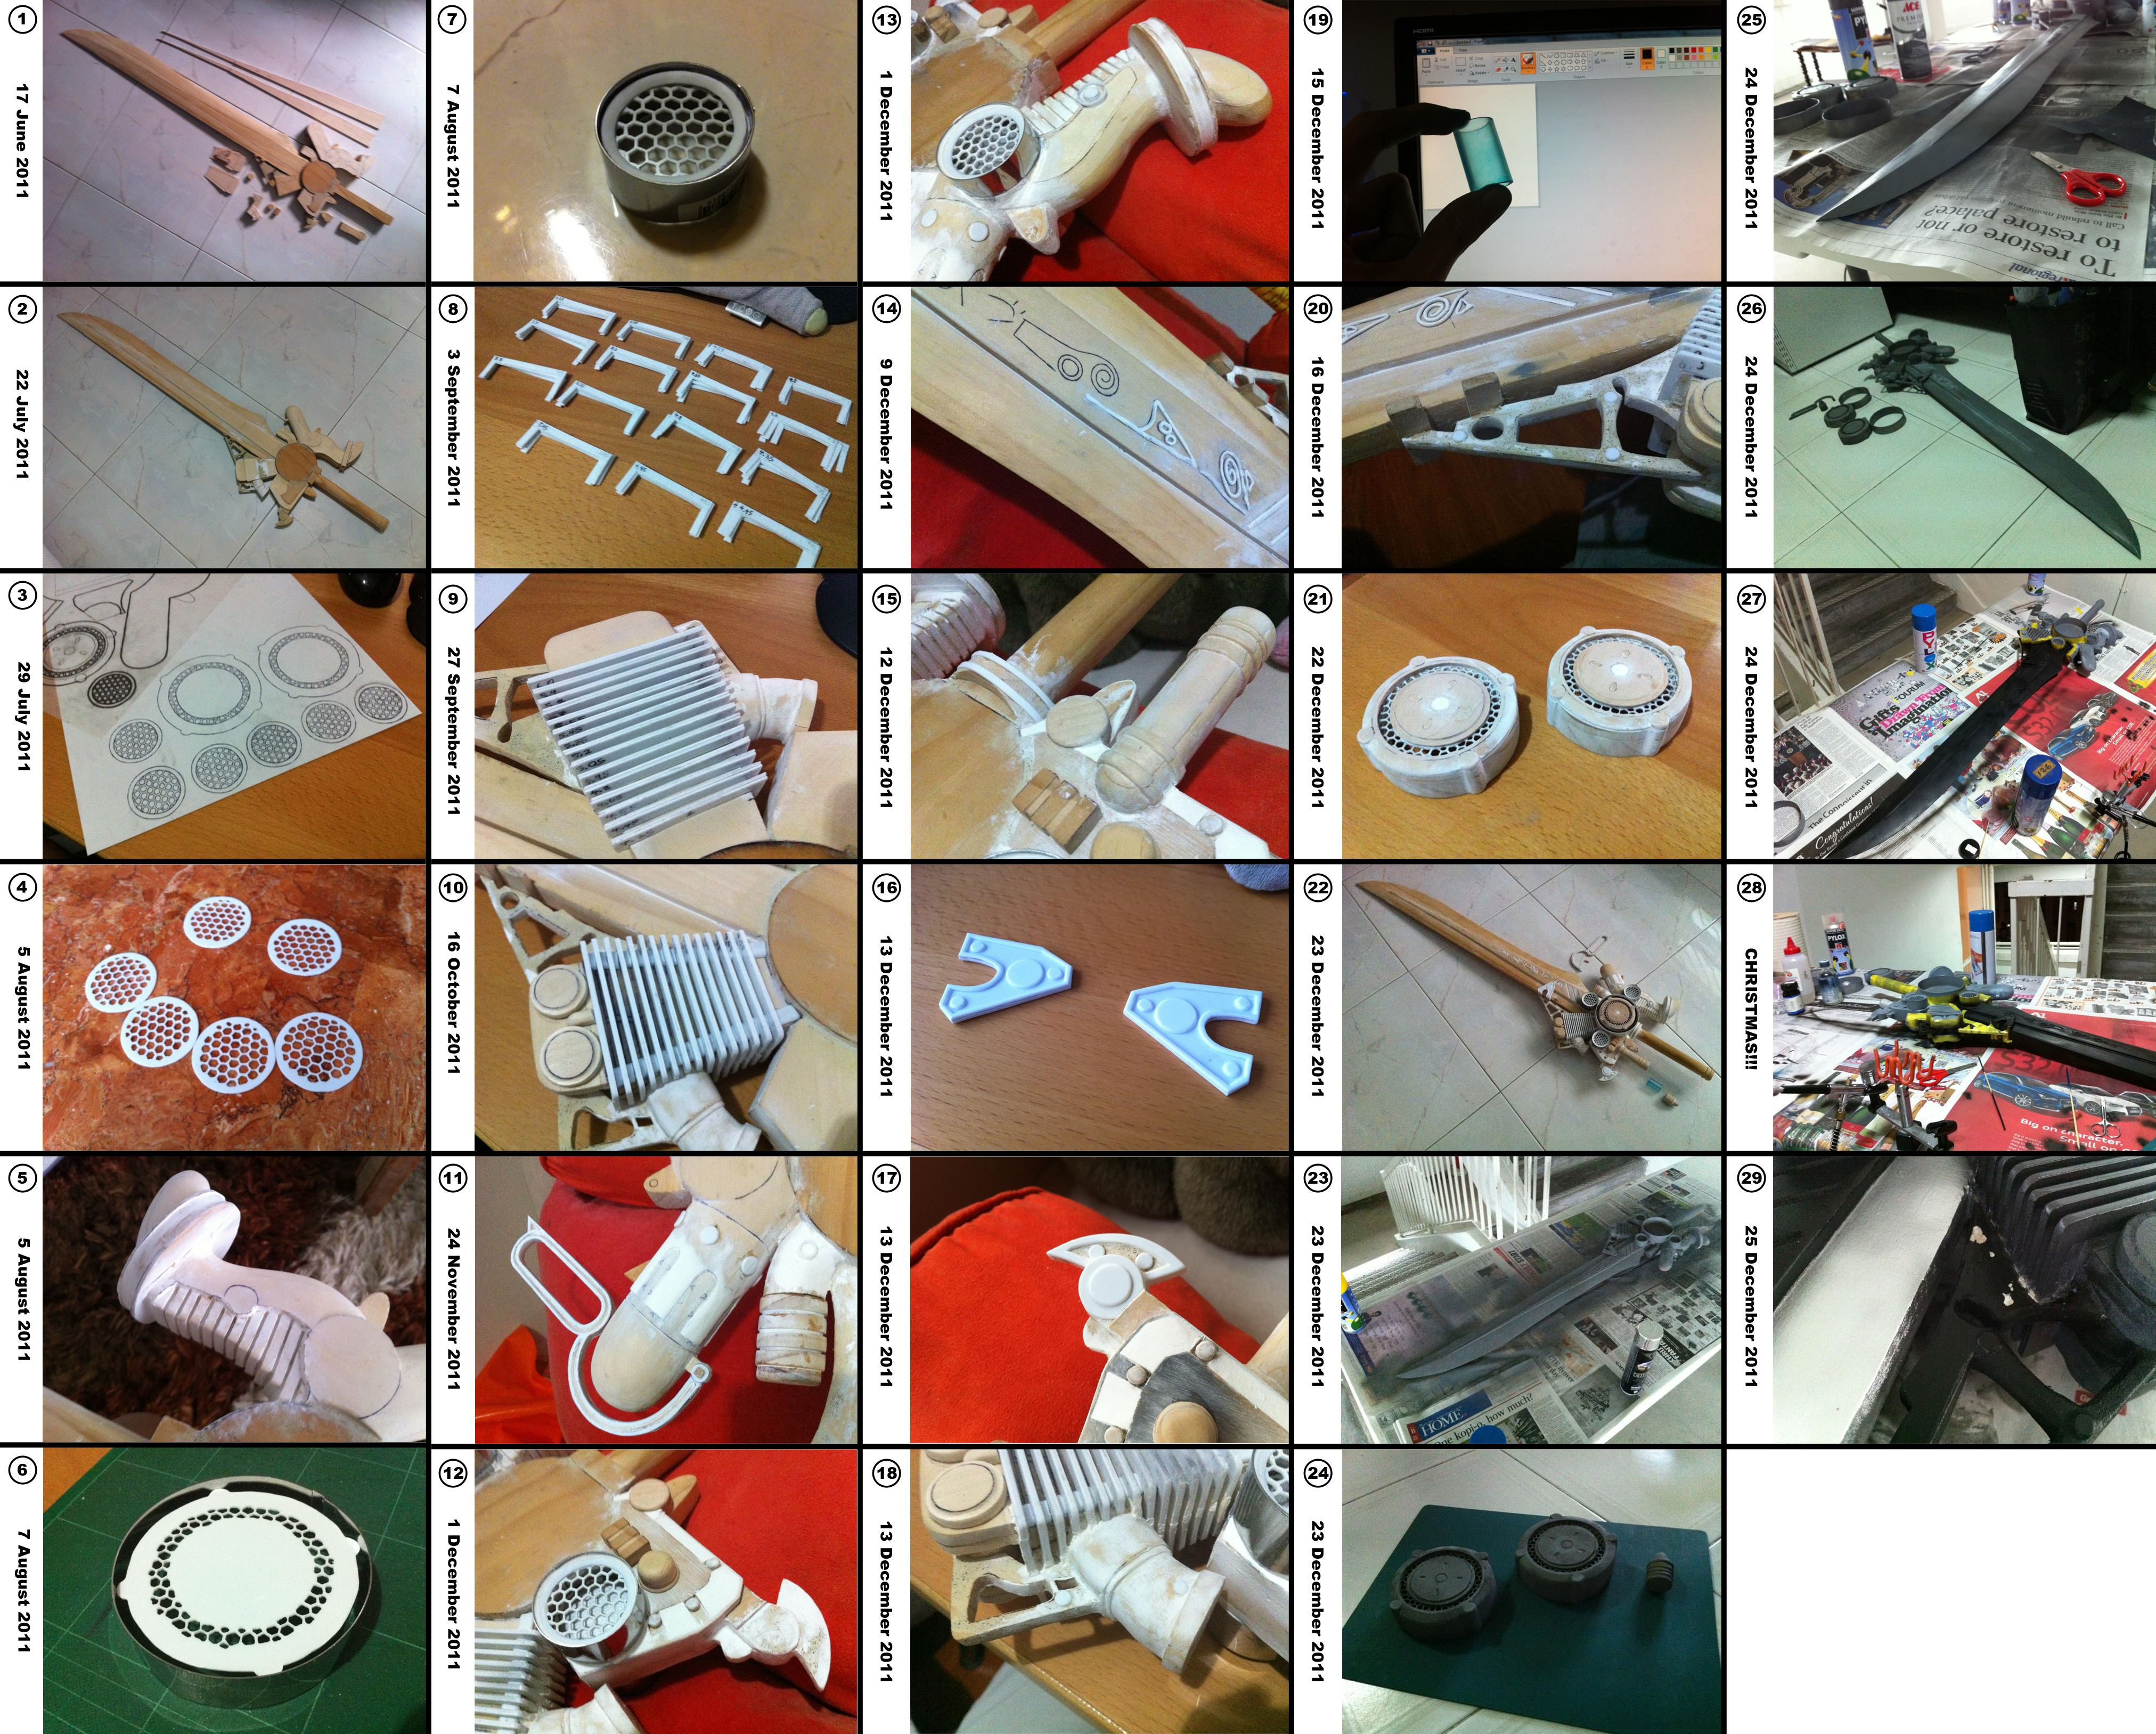
Charting my progress with the sword. If you're building one of your own, this might give you some insight on how I'm making mine. (I tried as hard to name the parts I worked on. Since I'm hardly a mechanic/engineer, don't be surprised if you have no idea which part I'm referring to. Kudos if you do though.)
(1) The first progress shot I took after a long while cutting the pieces out of wood and beginning to join them.
(2) Glued most of the pieces together, save for the circular exhausts, the rod next to the handle, the brake on the bottom left, and other small details. The layer on top of the blade has been sanded so that it slopes down from the start of the blade to the end. Most of the engine guard has been sanded to round perfection. The handle has also been rounded.
(3) Traced and inked out the exhaust grills on 1mm pla plate. Ready to drill the holes and cut out. At this point, I've also started work on the heat sink on the engine guard. Using a rotary tool with a makeshift router accessory to cut out the shape of the heat sink. Shots of it once I'm done.
(4/5) Hexagon exhaust grills are cut nicely into shape. Was a bigger pain in the ass then it seemed. Will add the tapered outer circles later on. The heat sink frills have been cut and sanded. The macaroon on top of the heat sink is done too. Lots of refining work as you can see from the white paperclay.
(6) The main hexagon exhaust grills are complete. Size test with my cookie cutters are a success. I had to break the cookie cutters open and readjust the size in order to fit my dimensions.
(7) Mockup of the smaller exhaust. On top of the hexagon grill is the tapered outer lining circle made of doubled-layered 1mm pla plate.
(8) Frill thingies for the heat sink. There are 30 of them in total, 15 on each side. Each frill consists of 2 layers of 1mm pla-plate, so I cut 60 layers of them out in total. = ="
(9) Mockup of the heat sink frills. The 'legs' were cut according to the necessary lengths. (To everyone following this: I'm so sorry that I've gone so long with so little progress! I'll try my best to work more on it! oTL)
(10) Sanded the edges of the frills, then properly glued them down along with the spacers. Will need to add paperclay to the area where both sides connect to fill up the cracks. Circular bolt things also done.
(11) Added the long U-shaped depressions. Brake handle done. Pipe end sawn off and redone. Added little details like the circle thingies and the 'stopper'.
(12) Glued on the circular exhaust. Glued on the little mechanical details. Filled the slope with paperclay.
(13) Carved in a crevice. Added the small button thing. Smoothened the tab sticking out from the side and drilled a shallow hole at the end. Glued on the circular exhaust.
(14) Creating the runes on the blade using paperclay. Later sanded to refine its shape and give it a pointy surface.
(15) Side handle glued on.
(16) Triangular caps on each side of the blade made using three layers of pla-plate.
(17) More details using pla-plate.
(18) Gluing on the little rivets.
(19) Made the transparent tube on the side handle using a hollow acrylic tube and turquoise glass paint.
(20) Gluing on more rivets.
(21) Gave the main engine core a base to sit on.
(22) All parts are done constructing. An overview of how it'll look like.
(23) Priming the sword.
(24) Closeup of some parts. The initial thing after priming looks horrible, but thankfully clears after some sanding.
(25) After sanding at 1000 grit, the blade shines!
(26) All parts done priming.
(27) Masking the sword. First spray of black.
(28) Working all the way through to Christmas day! Oh joyful day.
(29) Certain areas that were originally smoothed out with paperclay get ripped out after peeling the masking tape, leading to great agony. Yup, even after two layers of primer and one layer of paint. Lesson learnt: paperclay doesn't go well with sticky objects. Gotta find a better substitute for future projects. Perhaps epoxy putty or some other kind of filler?
__________________________________
nicknamed "Drive Edge".
Charting my progress with the sword. If you're building one of your own, this might give you some insight on how I'm making mine. (I tried as hard to name the parts I worked on. Since I'm hardly a mechanic/engineer, don't be surprised if you have no idea which part I'm referring to. Kudos if you do though.)
(1) The first progress shot I took after a long while cutting the pieces out of wood and beginning to join them.
(2) Glued most of the pieces together, save for the circular exhausts, the rod next to the handle, the brake on the bottom left, and other small details. The layer on top of the blade has been sanded so that it slopes down from the start of the blade to the end. Most of the engine guard has been sanded to round perfection. The handle has also been rounded.
(3) Traced and inked out the exhaust grills on 1mm pla plate. Ready to drill the holes and cut out. At this point, I've also started work on the heat sink on the engine guard. Using a rotary tool with a makeshift router accessory to cut out the shape of the heat sink. Shots of it once I'm done.
(4/5) Hexagon exhaust grills are cut nicely into shape. Was a bigger pain in the ass then it seemed. Will add the tapered outer circles later on. The heat sink frills have been cut and sanded. The macaroon on top of the heat sink is done too. Lots of refining work as you can see from the white paperclay.
(6) The main hexagon exhaust grills are complete. Size test with my cookie cutters are a success. I had to break the cookie cutters open and readjust the size in order to fit my dimensions.
(7) Mockup of the smaller exhaust. On top of the hexagon grill is the tapered outer lining circle made of doubled-layered 1mm pla plate.
(8) Frill thingies for the heat sink. There are 30 of them in total, 15 on each side. Each frill consists of 2 layers of 1mm pla-plate, so I cut 60 layers of them out in total. = ="
(9) Mockup of the heat sink frills. The 'legs' were cut according to the necessary lengths. (To everyone following this: I'm so sorry that I've gone so long with so little progress! I'll try my best to work more on it! oTL)
(10) Sanded the edges of the frills, then properly glued them down along with the spacers. Will need to add paperclay to the area where both sides connect to fill up the cracks. Circular bolt things also done.
(11) Added the long U-shaped depressions. Brake handle done. Pipe end sawn off and redone. Added little details like the circle thingies and the 'stopper'.
(12) Glued on the circular exhaust. Glued on the little mechanical details. Filled the slope with paperclay.
(13) Carved in a crevice. Added the small button thing. Smoothened the tab sticking out from the side and drilled a shallow hole at the end. Glued on the circular exhaust.
(14) Creating the runes on the blade using paperclay. Later sanded to refine its shape and give it a pointy surface.
(15) Side handle glued on.
(16) Triangular caps on each side of the blade made using three layers of pla-plate.
(17) More details using pla-plate.
(18) Gluing on the little rivets.
(19) Made the transparent tube on the side handle using a hollow acrylic tube and turquoise glass paint.
(20) Gluing on more rivets.
(21) Gave the main engine core a base to sit on.
(22) All parts are done constructing. An overview of how it'll look like.
(23) Priming the sword.
(24) Closeup of some parts. The initial thing after priming looks horrible, but thankfully clears after some sanding.
(25) After sanding at 1000 grit, the blade shines!
(26) All parts done priming.
(27) Masking the sword. First spray of black.
(28) Working all the way through to Christmas day! Oh joyful day.
(29) Certain areas that were originally smoothed out with paperclay get ripped out after peeling the masking tape, leading to great agony. Yup, even after two layers of primer and one layer of paint. Lesson learnt: paperclay doesn't go well with sticky objects. Gotta find a better substitute for future projects. Perhaps epoxy putty or some other kind of filler?
Image size
4048x3255px 7.98 MB
© 2011 - 2024 Laitz
Comments40
Join the community to add your comment. Already a deviant? Log In
I noted in your comments that you are hardly and engineer or mechanic. Well if you aren't now the level of your understanding of the components to make this says you have a future as an engineer. The ability to take a picture and render it into a three dimensional artifact is a talent indeed. Especially at this level.